- Reusing existing animations
- Creating custom animations for existing rigs
- Animating with existing rigs
Reusing existing animations
We can reuse existing animations if we create a mob with the same rig than an entity that already exists in Stonehearth (e.g. a reskin).
For example, many of the small critters (rabbit, raccoon, squirrel...) reuse the same skeleton and animations. Here's the render_info component in the squirrel.json file:
  "render_info": {
     "animation_table": "file(/data/rigs/entities/critters/rabbit)",
     "scale": 0.07
  }
As you can see, the "animation_table" points to the rabbit.json skeleton. The squirrel model has the same name for its layers than the rabbit model (the parts are located in the same places - they can be moved and rotated using the same pivots), so we can reuse all the rabbit animations without additional work.
We can also scale the model and the animations will work just fine.
Creating custom animations for existing rigs
In order to add new animations for existing rigs (for example, adding a new idle animation to the hearthlings) we need to use overrides in our manifest, since there's no index we can mixinto to add the animation.
An example is provided here. We override non existing files in the stonehearth mod, which will behave as if we were injecting our files in the appropiate folders.
Animating with existing rigs
Here's the process for creating animations for existing skeletons in Blender. Assumes that you've already set up the Blender add-on and prepared the scene.
Importing the model into Blender
These instructions assume that you've exported your model to .obj format.
With the scene prepared in Blender, go to 'File->Import...' click on "Wavefront (.obj)"
Select the .obj file. Make sure the .mtl and .png files are also on the same folder than the .obj (they're additional files created when you export to .obj).
Click on 'Import File'.
If you can't see the imported model, zoom out with the mouse wheel (if you already prepared the scene it shouldn't be the case).
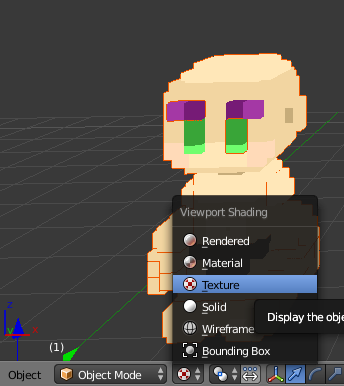
If the model appears all white, click on the small circular icon here and change it to "Texture":
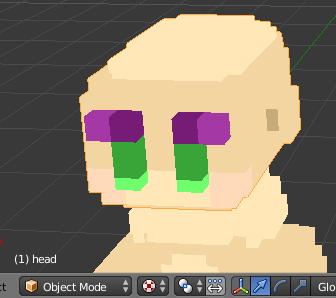
Check that the object has each part separated, in case something went wrong when exporting to .obj. When right-clicking on different parts of the model, only that part should show an orange outline, and its name should appear at the bottom left of the scene:
Loading the rig files
After importing the .obj, let's import and prepare the skeleton and meta files. If you're going to make new animations for an existing stonehearth entity, then get the skeletons from the stonehearth/data/rigs folder. You can copy the rig files elsewhere if it's more comfortable, so that you can have them together with your meta files:
Go to 'File > Import > Stonehearth (.json)'
Find the skeleton JSON file. In our case we're going to use the male hearthling model, so we search for the male skeleton. Select it, and click on 'Import File':

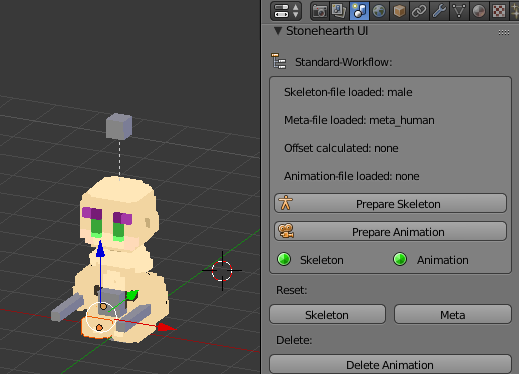
Now you should see the name of the skeleton file in the "Stonehearth UI" section of the scene menu, which confirms that we loaded a skeleton file.
Now we click on 'File > Import > Stonehearth (.json)' again and select the appropiate meta file. It should also appear as loaded in the Scene menu.
Click on the "Prepare Skeleton" button. If there are no errors, the helper bones should be created automatically and the bones / meshes on the model should be automatically parented to each other.
If something went wrong, the circle at the side of "Skeleton" will become red. In that case, you can click on the Skeleton or Meta buttons in the "Reset:" section to unload those files, check them manually and try loading them again.
The circle should become green if the skeleton was loaded correctly, but if it doesn't (and it's not red either), check the "Debugging info (on/off)" checkbox to expand the debugging info. There it will mention if there's some object missing or that shouldn't be there, and it'll say if the skeleton and meta files were loaded correctly.
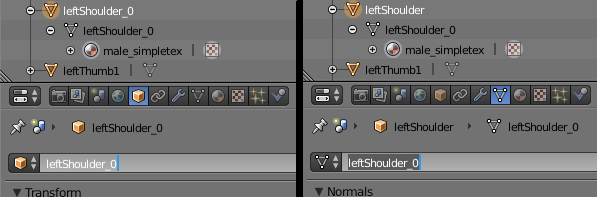
For example, here the add-on detected that some names do not match. Taking a look at the hierarchy, turns out the shoulders have
_0in their names: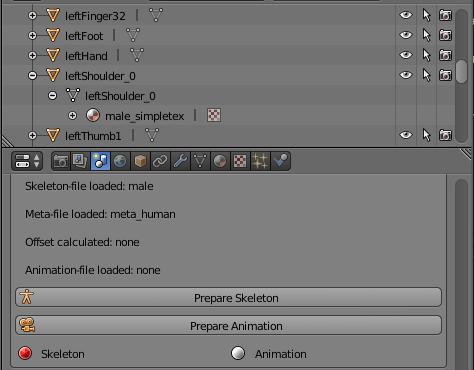
So we can click on them, go to the object menu (an orange cube icon), and rename them there (press Enter so that the name is saved). Then we have to rename them in the object data menu too (an inverted triangle icon).
When in doubt, you can reset the skeleton and meta files and import them again, but often it is preferred to restart from a clean scene, as some bad information might have been carried by the errors.
Normally when there's a problem it's due to some issue with the meta file or the name / number of bones don't match the expected values. Make sure that the circle is green before proceeding. In case you run into an issue, the "Debugging Info" section might provide some hints about the issue.
Now click on "Prepare Animation". If there are no errors, the model should move to the center of the grid in the scene, with the feet aligned to the floor.
 Same than before, if the circle for "Animation" becomes red, check the debugging info to see what happened. If it fails to move the entire model to the center of the scene, there might be something wrong with the relationships between bones / meshes. Check to see if a meta-file was loaded, or if the relationships have been created properly.
Be sure that you have centered your model before starting with the animation work. Otherwise, the animation might not perform as expected while it is running in Stonehearth. So make sure that the circle is green before proceeding.
About meta files
The purpose of a meta file is to add to the information provided by the skeleton file. They allow Blender to know about the relationship between the parts of an entity (not just their pivots) and the size of the helper bones. They are used by the add-on to make animating easier.
Example meta file for a rabbit:
  {
     "meta": {
        "helperBone": ["ATTOVERCOG", 3.500000, 5.000000, 3.000000, -3.000000],
        "helperBone": ["root", 3.500000, 5.000000, 3.000000, -3.000000],
        "hierarchy": ["tailEnd", "tail"],
        "hierarchy": ["leftBackPaw", "leftLeg"],
        "hierarchy": ["rightBackPaw", "rightLeg"],
        "hierarchy": ["rightEar", "leftEar", "ATTOVERCOG", "head"],
        "hierarchy": ["rightLeg", "leftLeg", "tail", "head", "rightPaw", "leftPaw", "torso"],
        "hierarchy": ["torso", "root"],
     },
  }
The meta file is a JSON file (has repeated keys, but we don't care since this is just for the add-on to retrieve more information). It contains these fields:
"meta" -- the container key for the information. Also represents that this is a meta file. Contains many entries of these types:
"helperBone" -- represents a helper bone. The first value of the array is the name of the helper bone (as defined in the skeleton file), then the next four values provide information about the size of the helper bone (x, z, head, tail).
X and Z will represent its width and height in Blender, the head and tail are for its depth from the origin/pivot (so we can have long sticks for the "mainHand" helper bone, for example). It helps animating them in Blender regardless of what we'll attach to them in the game.
Be careful when defining them as wrong values can cause problems when preparing the skeleton in Blender.
"hierarchy" -- represents the hierarchy between bones / meshes. The last bone in each array will be the parent of the rest of bones mentioned in the array, so when we move or rotate it, the children bones will follow the parent. Make sure that all the bones are descendants from "root" (see the example above).
We can create meta files from Blender, or reuse existing ones (at the moment this guide was written, most meta files had been lost or are outdated). They can be set up manually too if you just need to define some hierarchy or add some helper bone that's already defined in the skeleton file.
It is possible to create an animation without a meta file, but it will be much easier and more convenient if you load / import one. Just ensure that it is the proper file which fits to the model you want to edit. While meta files can be exchanged between gender (if they share the same bone hierarchy), they cannot be exchanged between entities.
Animating
Once you've prepared the animation, it's time to start animating. In our example here we'll provide simple steps to quickly make an animation for Stonehearth, but if you're proficient with Blender you can use its animation tools however you like. Just remember that for Stonehearth we can only define the position and rotation (scale not yet supported by the add-on) of the whole part of the model (mesh), not the individual vertices / planes.
First, you might want to switch the view to orthographic. To do that, press
NumPad 5or go to the View menu that is above the Timeline (the bar below the main scene) and click on 'View Persp/Ortho'. You should see 'User Ortho' at the top left of the scene view.- To rotate the camera, hold the middle button (mouse wheel) down and move your mouse.
- To pan around the scene do the same, but first press and hold
Shift.
Then, decide how many frames you want your animation to have, and type them in the 'End' textbox of the Timeline (the gray wide section at the bottom of the window), and press
Enterto confirm. You can change them later if you need to. You should see the gray bar increasing or decreasing depending on your values: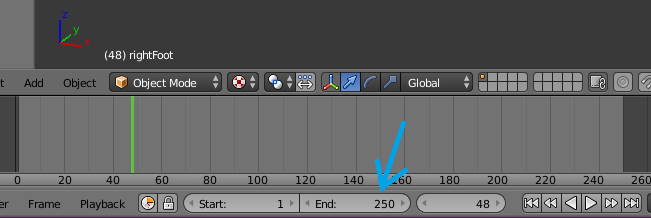
Animations in Stonehearth play at 30 frames per second. In general, we want short animations but sometimes they need to be long if the motion is meant to be slow (e.g. breathing, walking...). You can zoom in/out the timeline by scrolling with the mousewheel when hovering over it, and then there's a scrollbar at the bottom to move it left or right. That will make it easier to select the frames.
Now, select the first frame in the Timeline by clicking at the beginning of it. To pose the model, here are some shortcuts:
Right-click on a body part to select it.
Move it by dragging the arrows for each axis or by pressing
Gonce, then moving your mouse. To move along a specific axis, pressGand then X/Y/Z and then a number (can be negative and contain decimals).Please notice that in Blender Z is up, and Y is depth. Don't worry when animating, the add-on will take care of adjusting it if necessary.
Rotate it by pressing
Ronce, then moving your mouse. To rotate in a specific axis, pressRthen X/Y/Z and optionally type a number representing degrees (can be negative and have decimals).To scale it, it's the same than moving or rotating, but using
Sinstead. At the time this guide was written, scale is not supported in the add-on though.You can select more than one object by selecting one, then holding
Shift, and right-clicking to select another one.If you need more precision, open the hidden menu by pressing
Nand you'll see the transform / rotation / scale in numbers, which can be manually typed there: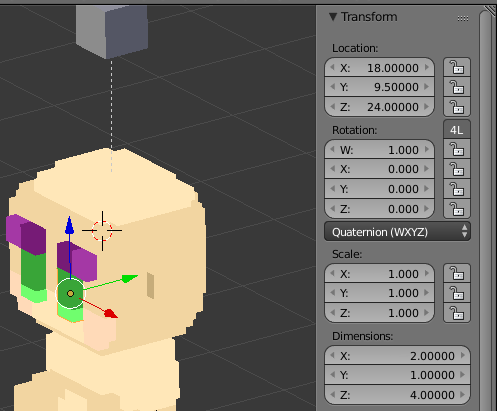
To cancel the transformation that you're doing, right-click once anywhere on the scene. You can use
Ctrl+Ztoo if you wish to undo changes.To confirm your changes, left-click anywhere.
You can use the Numpad keys to view the scene from the different sides (front, back, above, etc). There are also ways to open several scenes to have different views open at the same time.
After you have set an initial pose for your animation, select the 'Animation' tab from the menu on the left:
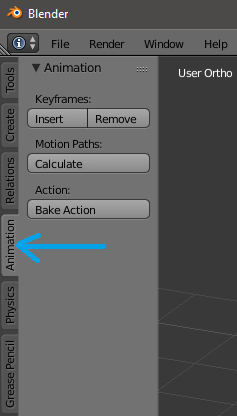
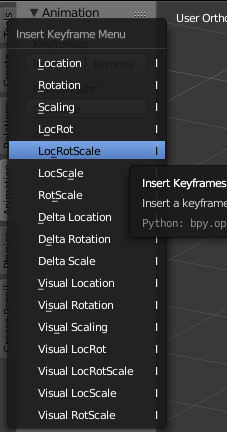
- Press
Atwice to select all the bones (everything should be selected with an orange outline). - On the Animation menu, press 'Insert' and click on 'LocRotScale'. This will save the current pose as a Keyframe in the Timeline:
- Now select the last frame in the timeline and do the same. You should see yellow marks where you inserted keyframes.
- Try playing your animation with the play button below the timeline. It's a static pose, but that way your animation begins and ends with the same pose.
- Press
Select a different frame (normally somewhere in the middle of the timeline) and pose your model again. Save the Keyframe as explained above and hit play. Blender will have interpolated the poses, creating an animation.
You can select an existing keyframe and delete it with the 'Remove' button (make sure to select all the body parts first!), or edit some parts of the model and save it again (will be overwritten).
Keep inserting (or removing) keyframes until you're satisfied with the results. You might need to extend or shorten your timeline.
Exporting the animation
Once our animation is ready, it's time to export it to the JSON format that the game uses.
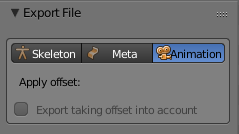
Go to 'File > Export > Stonehearth (.json)'.
Near the bottom of the menu at the left, make sure that what is selected is "Animation":
Give a name for the animation file (e.g.
custom_anim.json). In general we only use lowercase, underscores and numbers for the file names.Click on 'Export File'.
Exporting animations with skeleton offsets
Imagine you've finished an animation for the male hearthling model, and want to create the same animation for the female (assuming both have the same bones and bone names, but the pivots of the bones are different - e.g. the female hearthling is a bit shorter so her bones are positioned lower).
With the Blender add-on we can easily apply offsets to the animation so that we don't have to create the animation for the female from scratch.
 At the time this guide was written, the female hearthling skeleton is different from the male one, but you can simply add the eyebrow bones to it in order to export the animation with offset - the game will later ignore those bones in the animation (make sure to work on a copy of her skeleton though).
Steps assuming you've just exported the animation for the male and still have the male model, rig and the animation loaded in Blender:
Import the female skeleton, making sure to check the "Import skeleton for offset" option at the bottom left:
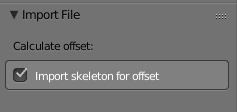 Make sure that the "Offset calculated" field above the "Prepare Skeleton" button from the Scene menu changed. If not, it wasn't imported correctly (the bones and bone names should match).
Export the animation again, checking the "Export taking offset into account":

To check that the animation was exported correctly, you can restart Blender, import the .obj file of the female, the female skeleton / meta files and the animation you just exported, and play it (or simply try it in the game, if you already have all the effects prepared).
Importing animations
You can import animation files from the game in the same way than skeletons or meta files. There's also a button in the add-on to delete imported animations.
It's hard to work with them since they describe all the frames, but you may be able to delete those you don't want and keep a couple poses for using in your animation.
Before importing an animation, make sure to click on "Prepare Skeleton" and "Prepare Animation", and that both have the green circle. Otherwise things will look broken after importing the animation.